Helping Students Master the Asanas
Part 2 of 3: Proportion (or, How to Teach Your Students Not to Look Like the Picture in the Book)
May 2, 2011
|
This article was written for the Ananda Yoga® Teacher Association newsletter. Learn more, or find a certified Ananda Yoga® teacher near you. |
Download pdf (890KB)
Seeing the Differences
Visualize a group of students sitting comfortably crossed legged on the floor with good posture in Sukhasana, Easy (sitting) Pose. In preparation for the next pose, you give them the first instruction: “Place your left hand on the floor.”
Now do you see in your visualization everyone maintaining good posture as they place their left hand on the floor, awaiting the next instruction? Or do you see any of the following from our pretend group of students:
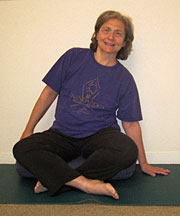
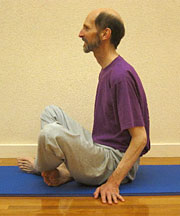
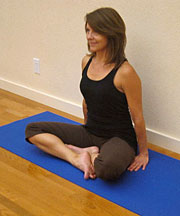
- Students like Edith, with bodies happily leaning to the left in order for their hand to reach the floor (first photo)?
- Shoulders lifted in order to keep their long arms straight, or elbows bent and totally relaxed like our student Gordon (second photo)?
- Some actively reaching, with their fingers or palms barely touching, like Anna strains to do (third photo)?
 |
 |
 |
Do you see anyone with the left hand touching the floor, having maintained good posture, being relaxed and lively at the same time?
Real life will give you these variations and more!
Does it matter that they are all following your instruction, but ending up looking so very different? Why do they look so different? Is it because of lack of flexibility? Or lack of postural strength? Or some other reason?
Before answering these questions, consider this instruction from Dandasana (Staff Pose), seated with legs out in front in preparation for Paschimotanasana (Posterior Stretching Pose): “Touch your toes.”
In order to follow this instruction, you might find some students bending from their hips and seemingly effortlessly touching their toes, while some strain with rounded backs to get at least one fingertip on one toe, others bend their knees in order to touch their toes, and yet others round their backs, hands unable to reach even their knees.
Can these differences be explained simply by the varying flexibility of the student’s hamstrings? And again, does it matter that they all look different?
Understanding the answers to these types of questions requires understanding the concepts of body proportions and range of motion of the joints.
Yes, it’s true that a student’s ability to look like the picture in the book can be hampered by strength and/or flexibility issues. However, often overlooked are issues of proportion and range of motion. As you will see, not only do proportion and range of motion matter in a student’s ability to mimic a pose, but what constitutes “mastery” of a pose will vary from student to student, depending on the proportions and range of motions of their bodies.
The essence of mastering a pose was discussed in Part 1: Helping Students Master the Asanas.This article will discuss in more detail differences in proportion, how to modify the asanas for the students, and how not to attempt to make the students look like what they are not—and should not be! Range of motion will be discussed in more detail in Part 3 of this series. Understanding these two interrelated concepts has great importance for the practice and teaching of yoga.
Does Looking Different Matter?
First of all, does it matter that your students all look different when they are in a pose? The answer is, Yes! And not only does it matter, I hope they all do look different! After all they all walked into the studio looking different (unless you have classes only for identical twins)! People come in all shapes and sizes—and, might I add, proportions.
We see different proportions all the time: long legs with a short torso, or short legs and a long torso. A long neck with short arms, or a short neck with long arms.
Do these differences have any potential negative consequences in the practice of asanas? Not in and of themselves, but there can indeed be negative consequences if those differences are not taken into account in the manner in which one practices.
Let’s return to our first example: “place your left hand on the floor.” On a physical level, it’s unlikely that any students will hurt themselves, even though their bodies are positioned differently. So on that level, the differences don’t matter much. On a more subtle, nonphysical level, however, the answer can be different.
Consider our first pictured seated student: Edith. She has placed her spine in an awkward position. In yoga, placement of the spine is vital for both maximum safety in and maximum benefit from any asana. Edith isn’t likely to hurt herself in this case, but it will be difficult for her to feel energy flowing inward and upward in her spine—perhaps difficult even for that energy to move at all, regardless of whether she can feel it—yet that inward and upward flow is what yoga practice is all about.
In the second photo, Gordon has a nice, relaxed arm that bends when his hand comes to the floor. It’s because his arm is so long. However, he is also not experiencing the optimal benefits from his practice because of tightness in his hips that prevents him from sitting upright and puts stress on his knees and spine.
In the third photo, Anna comes closest to looking like the picture in the book. However, a discerning yoga instructor will see the tension in her neck area and notice that she has almost no natural curves in her spine. That instructor will want to work with her on that aspect of her asana practice. Fairly flexible students with roughly even proportions can most easily look like the picture in the book, but the fact that they might look “good” doesn’t necessarily mean that they don’t have a lot to learn and/or have spinal issues, just like Anna. She particularly has issues with her neck.
Return to Dandasana
In our second example—“touch your toes”—there is definitely a risk of straining the lower back if students do not move appropriately for their own bodies.
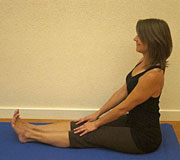
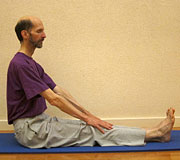
Let’s look at Edith, Gordon, and Anna in Dandasana and see if we can predict who will have an easier time following the instructions to “touch your toes” due to body proportions.
 |
 |
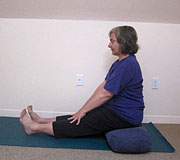 |
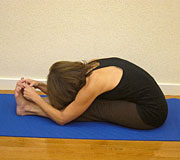
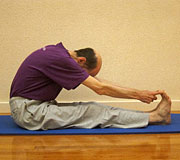
In the first photo, we see that Anna’s hands comfortably reach her knees. In the second photo we see that Gordon’s hands easily reach well beyond his knees. In the third photo Edith strains to get her hands to her knees.
Looking only at proportion as a factor, one might assume that Gordon will have the easiest time touching his toes, since he’s already reaching past his knees. Next easiest would be Anna. We might predict that Edith will have the most difficulty reaching her toes.
If only it were that simple! We also have to take into consideration each student’s degree of flexibility.
It turns out that our most flexible student of the three (Anna) has the easiest time reaching her toes. In fact, she can grasp her toes while her elbows are bent, even with her average length arms. Our least flexible student, Gordon, comes in second, in ability to touch his toes. This is because he has relatively long arms. Edith, with her tight hamstrings (though not as tight as Gordon’s) and relatively shorter arms, needs to sit on a cushion and bend her knees in order to reach her toes.
 |
 |
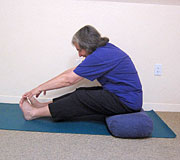 |
Let’s analyze this pose a little more. In the photos, all of the students have rounded spines, yet one of them is safely in the pose, and the other two are not.
The first student, Anna, is safely in the pose, not because she is clearly flexible and has an easy hold on her feet, but because we can see that her pelvis is tilted well forward, so her ischial tuberosities (sitbones) point backward—away from her toes. Anna’s upper pelvis comes forward allowing her abdomen to rest on her thighs. This positions keeps pressure off of the spine and brings the stretch primarily into the hamstrings.
Gordon is pictured next. The tilt of his pelvis is exactly the opposite of Anna’s: his upper pelvis is tipped back away from his feet. While it’s safe to assume that Gordon was feeling some stretch in his hamstrings, this rounded position puts stress on the spine and back muscles. Sometimes more stretch will be felt in the spine than in the hamstrings in this type of position. The stress can be felt anywhere along the spine: low back, mid back, or even the neck. Whether it feels like a strain or not, this position is to be avoided as the stress can cause back pain, discomfort or injury—either right away or over a longer period of time.1
Edith’s forward bend finds her pelvis in a more-or-less upright position. This means she is bending primarily from the waist. In order for her to reach her toes, she must bend her knees. This position puts strain on the spine and back muscles, just as Gordon’s position does. However, her bent knees and pelvic position will put less strain on her back.
What it Means to Master a Pose
Let’s review for a moment what it means to master a pose. I do not begin with the picture in the book, because we have already seen that some body types will not be able to replicate positions that other bodies are able to do easily. Still I believe that mastery can be achieved in asanas regardless of body proportions (provided the asanas are of appropriate level and type). Instead of using the picture in the book as a point of reference, I try to ensure that the benefits of the asana are being fully achieved. That has a lot to do with the position of joints, and everything to do with the position of the spine, which in turn affects the energy and experience of the asana.
 |
 |
|||||
| ||||||
 |
 |
|||||
| ||||||
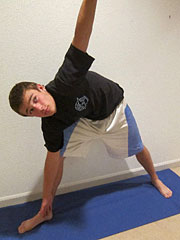
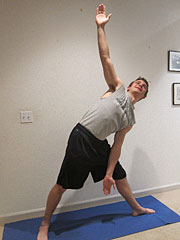
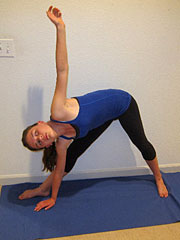
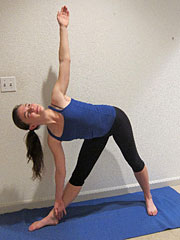
When exploring the benefits of an asana remember that working with Swami Kriyananda’s affirmations can help one to understand and reap many benefits from the poses. In the example from Part 1 of this series, the affirmation for Trikonasana (Triangle Pose) is “Energy and joy flood my body cells! Joy descends to me!” Believe me, there are a lot of yoga practitioners, students and teachers alike, who not only do not feel energy and joy flooding their body cells in this pose, but who also are wondering what on earth that affirmation has to do with this pose!
That’s what our students Mark and Victoria (from Part 1) wondered until they made corrections to their asanas (see photos at right). Now they feel some energy. Now they can smile and begin to feel the joy!
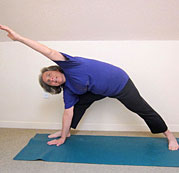
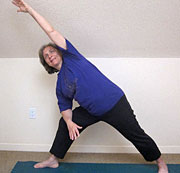
The placement of the spine is a key to reaping the maximum benefits from a pose. It may be necessary to use props or modify arm and leg positions, not only to maximize the benefits of a pose, but also to prevent injuries. In other words, although it may be okay physically for a student with short arms to place a hand on the floor in a pose like Parsvakonasana (Side Angle Pose; see first photo on left below), s/he will not necessarily be getting the maximum inner benefit from the pose. Parsvakonasana’s affirmation—“I am a fountain of boundless energy and power!”—is not wimpy! In order to experience the energy and power of Parsvakonasana, one needs to have a long, straight spine.
 |
 |
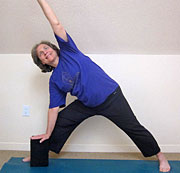 |
The two photos of Edith in a modified Parsvakonasana (one with elbow on knee, one with hand on a block) show a straighter, longer spine than the first one; you can see how both modifications have a lot more energy and power. In fact she might be over doing it just a bit – can you see how she has taken her head back too far, looking up at her hand rather than keeping her neck in line with the rest of her spine?
How to Instruct Students with
Different Proportions
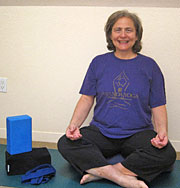
So now that we know why it matters, let’s discuss what to do about it. When the arms are relatively short compared to a person’s waist, we need to use “arm extenders” (blocks, straps, or cushions, depending on the asana—see photo at right) or positional adjustments in some poses.
 |
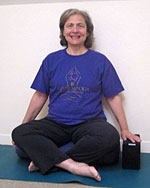 |
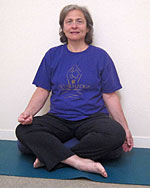
Let’s return to the first example in this article: “From Sukhasana, place your left hand on the floor. What you might need to modify from this point will depend on what you want students to do next. If you want them to keep the spine straight, then as long as the hand will not need to bear weight, they could just let the arm relax by the side or let the fingertips touch the floor, depending on their actual relative arm length (see Edith’s photo, far left). However, if you want straight spines yet students will need to put weight on the hand, then some may need to place a block under their hand, so they can do so without bending the spine (see photo, near left).
If instead you want a lateral bend, not a straight spine, then Edith’s hand might be perfectly placed in the first photo (at the beginning of this article). Gordon would need to move his hand further away from his body to enable him to move fully into the bend. Anna would need to turn her fingers out laterally from the wrist to move easily into a side bend. (I never said this would be simple!)
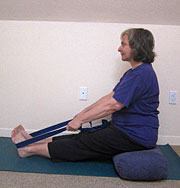
For Paschimotanasana, using a strap around the feet can act both as an arm extender and as an aid for those with tight hamstrings. (See photo at right.) The tension created in the arms from holding the strap can help students maintain a more upright posture — the primary goal early in the pose, before relaxing fully — and eventually to begin tipping the pelvis forward so as to go deeper into the forward bend without losing length in the spine.
Blocks are helpful also for short-armed students in many of the standing asanas that involve reaching toward the floor. I do not often have my students use blocks in standing poses because I am also teaching them to engage their core/trunk muscles and not rely on the floor or a block to support their weight. However, for students who cannot yet support themselves properly from the core, or are struggling with their balance, using a block or an arm on the thigh as pictured above can be very helpful. (Note: If they are struggling a lot with their balance, they should be standing close to a wall for support.)
Students with long arms will sometimes need to bend slightly at the elbow for some positions, lest they compromise spinal or shoulder alignment.
Additional tips on body proportion
Long-waisted vs. short-waisted
People with long waists (long torsos) will find that they usually need to pay more attention to building their core strength than someone that is short-waisted. Certain movements—such as moving into and out of Paschimotanasana or a standing forward bend—will require more muscular strength for a long-waisted person than for a short-waisted person. It’s a matter of physics: Those movements take the upper body and head farther away from one’s center of gravity.
Small or narrow feet
People with relatively small and/or narrow feet will find balance asanas more challenging. No need to do anything different here. Just encourage your student to keep practicing, and in this case s/he should be able to at least have balance as good as the person pictured in the book!
Flat feet
 |
| Flat Arch |
 |
| Normal Arch |
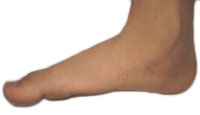
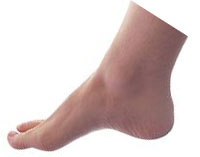
No, or very little, visible longitudinal arch on the foot — a condition known as “flat feet” — is a different matter. It’s not that everyone needs to do something to make their feet look more like the picture in the book—remember: if it’s not broken, don’t fix it—but it is important that the weight is properly distributed on the feet.
For example, people with “flat feet” often tend to “roll in,” placing too much weight medially on the foot. As the student works to correct this, watch that he or she does not overcompensate and begin to place too much weight on the outer edge of the foot. However, if the flat-footed student is having foot, ankle, knee, leg, and/or hip pain (sometimes even back pain), then strengthening the arch might be helpful. This can be a very individual matter, and it’s better explored in a course or workshop than in an article of this limited scope. As a general direction, however, you can encourage a flat-footed student who tends to roll in, or is having problems potentially associated with the flat feet, to lift the arch actively while standing, being careful not to overcompensate and place too much weight on the outside of the foot. Also, simple point-and-flex exercises for the feet can be helpful in strengthening the arch of the foot.
Round bodies
See the article on Teaching Yoga for Round Bodies for ideas on how to make adjustments for different body proportions due to body mass. For example, in a supine knee-to-the-chest stretch, the knee cannot come close enough for the hands to easily hold the leg in place. In this case, use a strap on the foot so the arms will reach the legs.
Moving forward
Are you getting the idea? Modify the asanas and/or use props so that you maintain spinal integrity and allow the asana and its affirmation to come alive. These are general suggestions to get you started working with people with different body proportions. In the Musculoskeletal Yoga Therapy course that I teach at The Expanding Light, we explore and practice many dimensions of these concepts of body proportions, in addition to numerous other topics.
When we get it right:
Energy and Joy will flood our body cells, and Joy will descend to us
(and to our students)!
(In Part 3 of this series, Nicole explores how to work with students’ varying range of motion issues.)
1 Those of you who practice Maha Mudra might wonder whether this contradicts the usual instructions, in which we do feel a pull in the spine in order to stimulate energy and awareness in the subtle spine. No, there’s no contradiction. Maha Mudra differs from a forward-bending asana in two important ways: First, although most people do get a hamstring stretch in Maha Mudra, that’s not an important aspect of the technique; we bend the knees as needed, which can help to protect the spine. Second, although we do pull on the toe(s) in Maha Mudra, we also engage the back muscles to pull back against the grip on the toe(s), so there’s a dynamic opposition between the two pulls (which both energizes and protects the spine); we’re not forcing the spine to bend forward in an unhealthy way.
Related
- Helping Students Master the Asanas, Part One: Understanding Mastery
- Power Yoga — Ananda-Style!
- Engage Your Core?
- Tadasana, the Standing Mountain Pose
- Forward and Backward Bends
All authors are graduates of Ananda Yoga Teacher Training.


