
Yoga Asanas and Stretches for The Lower Back
Hey, guess what? We are going to pretend that Randy — you remember Randy from the last therapeutic yoga article, whom we almost sent to the hospital because he had so many complications with his back problem — has responded well to a conservative yoga therapy program.
Can you guess what has been his favorite part of his yoga program? Well, it’s the Ananda Yoga® affirmations: he just loves them.
At first it was hard to tell because he was concentrating so hard on doing his yoga postures correctly that we weren’t even sure he was paying any attention to the affirmations.
After a while, though, he began asking us to write them down for him. He says he uses them when he is driving in heavy traffic or finds himself in other tense situations; he finds that they help him to stay calm and more relaxed. So Randy is doing just fine — more about the affirmations a bit later.)
Now let’s review how to know which asanas to start with for our students with low back concerns. Then we will move into the “how to” section.
Location … Severity … Type of Condition
When choosing asanas for a person with lower back problems, you need to assess the location, severity, and probable general type of condition.
The location, as mentioned in the previous article, is usually best ascertained by having the student touch where it hurts. This helps alleviate potential miscommunication from students who may know how to pronounce some anatomical terms, but do not really know anatomy.
Severity is determined by the pain level and the effect of the problem on the student’s daily activities. The higher the pain level, the greater the severity. This information is coupled with any limits or changes the student has to make in his or her daily activities. In some cases, there may be no change in daily activities. However, common examples of changes would be inability to sit for long periods of time, sleep adversely affected, favoring one side while walking, unable to bend over to pick something up, etc. The greater the effect on daily activities, the greater the severity.
General types of conditions will, for this discussion, broadly fall into two categories: muscle strain/sprain and nerve/disc involvement. (We call these “probable categories” because, unless we have the relevant medical training, as yoga instructors we are not qualified to diagnose.)
Muscle strain/sprain can range from overworked muscles due to an overly exuberant workout the day before, to more severe strain from an accident or chronic problem. The sensations tend to be described as stiff, achy, sore, and tender. The sensations that tend to describe nerve and/or disc involvement are sharp, tingling, numbness, radiating pain, and compression. You can also suspect nerve and/or disc involvement if twisting or bending in a particular direction produces a sharp, sometimes knife-like pain, or a radiating pain, or a significant increase in pain. A student may have only one or a few of the symptoms, and of course there will be some overlap in the description of the symptoms.
If you suspect or know of nerve involvement and/or disc involvement, act conservatively and avoid forward bends, twists, backward bends, and seated postures. Attempt these positions only in very low severity cases that are responding well to yoga asanas and physical therapy. This sounds extreme, but in most cases these movements will aggravate the condition. There are exceptions, but those require more skill and knowledge than can be gained from an article like this.
Besides, there are so many effective therapeutic asanas that avoid these movements that I do not feel it essential to know all of the asanas that one could potentially, possibly do. (By the way, you might ask if the student is currently seeing a physical therapist. If so, ask what the therapist is having him do. If the therapist is having him do twists, for example, then it’s probably okay for him to do twists in your classes.)
Strategies for Pain Reduction and Prevention
The main goal is to get timely, positive results. Applied sensitively, the handful of basic asanas listed in this article can go a long way toward achieving that!
When working therapeutically, it’s best to not hold asanas for long periods. (It’s okay to hold restoratives longer, but even then be careful to not overdo it.) Repetitions are best, because injured muscles are by nature fatigued and unable to maintain the work effort without more periods of rest.
If the pain level is moderate to high, pain reduction becomes the first priority. Good basic poses to begin trying include pelvic tilts, single and double knees to the chest, inversion at the wall, and knees bent resting on a chair (see below: Low Back asanas, Group A). Remember to ask continually for feedback on the effects of the positions.
Pranayama — especially good old basic diaphragmatic breathing — is very important for pain reduction. I almost always emphasize the exhalation, as that is where people tend to shortchange themselves. Be sure that the student is in a supported supine position such as Savasana, with a bolster under his knees or with his legs supported on a chair seat.
Keep it simple; deep belly breaths can do wonders. More technical pranayamas (e.g., alternate nostril breathing) can cause an increase in tension for some students — especially those in pain — as they struggle to do it right.
As mentioned before, some students may find that a regular yoga routine is sufficient in and of itself to alleviate their lower back concerns, without much emphasis on the therapeutic asanas. You can gauge this by their current activities and pain level. It’s especially important that people with lower back concerns do all their asanas asanas in asanas in with proper alignment. A student who has never been injured can get away with much more poor alignment than can an injured student. Also, keeping the abdominal and low back muscles strong will be necessary to prevent re-injury.
Now I’ll describe what I feel are some of the safest, most effective asanas that can be used for a wide range of low back symptoms. These asanas are good for all students as warm ups, building blocks, prevention, and as counter-poses.
Anyone with a low back concern should begin with the asanas in Group A. Someone without nerve or disc involvement can begin with the asanas in Groups A and B right away. Otherwise start with Group A and slowly add from Group B — only one or two at a time as seems appropriate over time. These asanas represent a conservative approach to lower back concerns.
Please note that I’ve excluded twists and standing poses, which in many cases are very good for the low back, but can potentially aggravate quite a few conditions. Once a student’s condition has stabilized, you can begin introducing twists and standing asanas. If you have a student who is already doing well with these or other positions (perhaps assigned by his physical therapist), by all means go ahead and use them.
Standing and seated forward bends are probably the hardest on low back problems; save them for when your student is strong and has not had any symptoms for a long time.
Low Back Asanas, Group A
These are the basic poses for all conditions, and specific for pain reduction and suspected nerve/disc involvement.
Supported Savasana
A student with back pain should do Savasana with support under the knees. Even after he no longer feels back pain, he should continue this to help prevent a relapse.
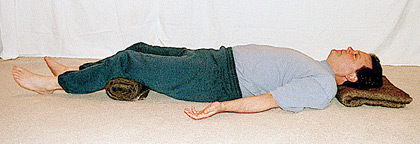
Start with a roll under the knees, and if that does not seem to be effective, support the entire lower legs on a stack blankets or pillows, or on a chair. Be sure that the neck is in its natural curve; support it as needed to restore the curve. If the cervical spine is not in proper alignment, the lumbar area will not be able to release fully and be tension-free. Keep working until you find a truly comfortable position.
Savasana with Pranayamas
Diaphragmatic breathing is very important. When one is in pain, one tends to breathe very shallowly and tensely, which in turn can cause even more pain and discomfort. Deep belly breathing is often all that’s needed. If you feel that the student is ready for more, try even-count breathing and the full yogic breath. Even-count breathing can be effective if the count is not too long and you remind the student to relax even more deeply during the holds. With the full yogic breath, watch to insure that the student does not tense at the “top” of the inhalation.
Supine Under-Curve (Tuck) Pelvic Tilts
These unassuming little movements can work wonders. The knees should be bent with the feet flat on the floor, a comfortable distance apart (photo below).
There are two ways to get the lower back onto the floor in a pelvic tuck. One way is to push the lower back down into the floor and push the stomach out at the same time. The second, more proper, way is to “scoop out” the abdominal area, moving the abdominal muscles down as the lower back presses into the floor in the tuck position.

The first way gives some benefit to the lower back but does not engage the deep pelvic muscles. It also encourages the development of protruding abdominal muscles — something that nobody wants and that serves as a reminder to allow the abdominals to move down with the lower back in a proper tilt.
To check if a student is doing this properly, have him place his hands on his abdomen, then relax and inhale (the abdomen should rise with the inhalation), then exhale and tuck. The abdomen should lower on the exhalation, and continue to lower away from the hands as the student goes into the pelvic tuck. Relax everything on the ensuing inhalation, then exhale and tuck again.
Continue for a number of repetitions. If the breathing pattern confuses the student, tell him to forget about the breath — simply breathe without holding the breath. Even if he does not coordinate movement with the breath, his abdomen should move down along with the lower back in the tuck on the exhalation. Also, contracting the deep pelvic muscles on the exhalation will strengthen them, while the lower back muscles are gently being lengthened.
This is effective both to reduce pain and to help with strength and flexibility over the long term.
Single Knee to Chest

To keep the lower back comfortable without strain, the opposite leg may need to have a bolster support, or be bent (foot on the floor). Use a strap if needed to make the stretch more comfortable — or even doable in the first place.
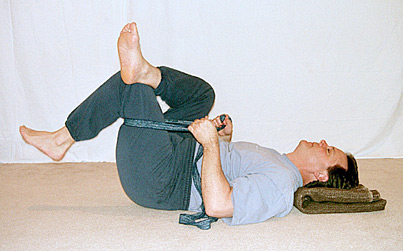
Double Knees to Chest
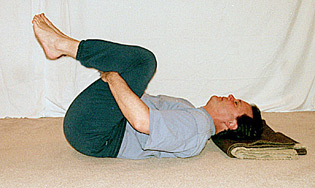
Check the cervical alignment. The student’s head and/or neck may need to be supported.
If it is a strain, or in some cases impossible, for the student to grasp the legs, then use a strap to draw the knees to the chest.
Inversion at the Wall
This can be wonderfully relaxing and healing. Support the student’s neck and/or head as needed. If the student has tight hamstrings and cannot relax the legs in a straight position close to the wall, move him far enough away from the wall to make this possible.
If the lower back releases in such a way that it becomes uncomfortable (this can happen), have the student slowly come out of the position; then have him walk around the room in a pedestrian manner, which usually re-stabilizes the lower back. Next time have the student hold the position for only a brief period of time, and build up the time gradually. The piriformis stretch (#7 in Group B below) also can be done at the wall, eliminating the need to use the arms to get the stretch.
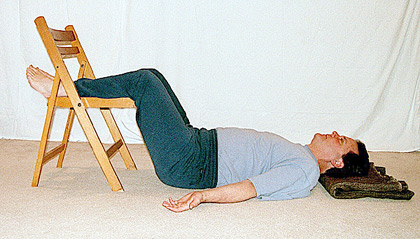
Supine with Chair Support for the Legs
This can be an effective alternative both to Savasana with bolsters and to inversion at the wall.
If your student was able to come to your class, he should be able to do all of the above pain-reduction asanas. Still, always go slowly, ask questions, and be ready to improvise, because some of these asanas may not work for some reason.
After the pain is less severe or even gone, continue with Group A asanas, and begin adding asanas from Group B.
Low Back Asanas, Group B
These are for low-to-moderate severity, and for stability and prevention.
Inversion at the Wall with Piriformis Stretch (#7 below) or with the Legs in Butterfly Position
For the butterfly position, have the student bring the soles of his feet together into butterfly position; then tell him to relax and that it’s okay for the feet to move apart when they relax.
Yogic Sit-Ups
The first key to yogic sit-ups is to do them consciously, with awareness and coordination of body, mind, and breath (thus “yogic” and not the usual “go for the burn, as many as you can” type). Do not hold the breath.
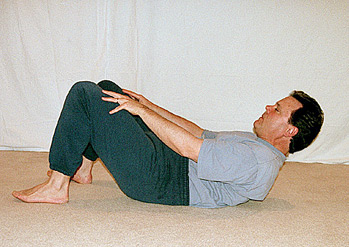
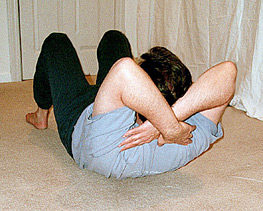
The second key is to do the sit-up with a deep under-curve pelvic tilt (tuck). The fingers should rest on the thighs and not go above the knees (photo right top); this keeps the lower back on the floor and protected. If the student experiences any neck discomfort, then the arms should be crossed behind the head to support the neck (photo right bottom). Even slight discomfort in the lower back means that either the pelvic tilt is not strong (or even existent), or that the muscles are fatigued and one should rest.
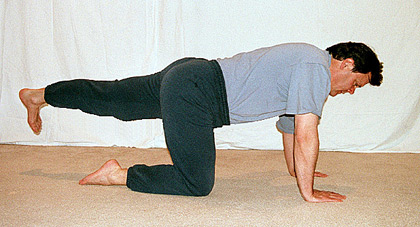
Table Pose with Leg Extensions (photo below)
Be sure that the student does not remove the natural spinal curves by swaying the lower back, twisting, or lifting the head up.
Modified Cobra
This is the sphinx pose, except the lower back and legs should remain relaxed. Do slow repetitions, not holding the position for very long.
Psoas Stretch
The psoas muscle attaches to the lumbar spine and inserts on the lesser trochanter of the femur. When this important hip flexor is too tight, it pulls the lumbar spine toward lordosis, compressing the discs. To stretch it, the student should lie flat on his back and fully stretch his body, with the arms straight overhead. The wrists are bent fully backward, finger tips on the floor, and the toes are flexed toward the knees.
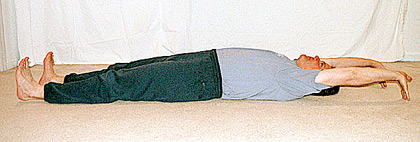
Maintaining a very active stretch in this position, the student should then press the navel toward the spine and the spine toward the floor (photo above). Hold for only a few seconds at first, then release just the lower back and abdomen. Repeat the pressing of the lower back down into the floor a few times before relaxing completely.
As a variation, press down with just the left side of the abdomen and low back, then just the right side. Repeat the whole sequence a few times, with rests in between.
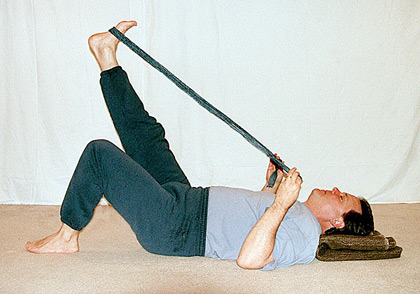
Leg Stretches with a Strap
Make the same adjustments (as needed) as are you would make with “knees to the chest” (#A4, A5).
Piriformis Stretch (a.k.a. “Figure-4 Stretch”)
The piriformis muscle is deep in the pelvis, attaching to the anterior sacrum and inserting on the greater trochanter; it helps rotate the hip externally and is often involved in sciatic pain. If the student cannot easily take hold of the leg to come into the stretch, give him one or more of the following props, or else use the wall: If the student’s head tilts back even a little, put a blanket (or pillow) underneath his head so he can maintain the natural cervical curve.
A strap around the leg that is being drawn up will help an inflexible or large student hold the position more comfortably (or be able to reach that leg in the first place). Doing this stretch at the wall can work very well, as that enables the arms to stay relaxed.
Again, use a support for the head and neck if needed. Start with the legs straight up on the wall. Cross one leg over the other, bringing the ankle onto the opposite thigh just below the knee. Then bend the leg still at the wall (sliding the foot down the wall) enough to feel the stretch in the piriformis, other area of the gluteals, or inner or outer thigh.
Depending on a student’s relative tight spots, this stretch, though primarily intended to stretch the piriformis muscle, may also stretch these other related areas. Even a very slight bend might create an intense stretch. Some students may need to scoot a little bit away from the wall in order to have a comfortable stretch. The buttocks should not lift off of the ground.
Speaking of the Affirmations
Now, let’s get back to Randy. Are you wondering about the affirmations for “knees to the chest” or yogic sit-ups?
Well, I’ve not heard of any official versions, but here’s what I do: I don’t believe that we need a new and different affirmation for every asana — especially the “building block” and therapeutic types of asanas — so I borrow from the wonderful list of affirmations that we already have. For a building block asana, I use the most appropriate affirmation from the asana or asanas that one is potentially building up to.
For example, “inversion at the wall” (#A6 above) is a preparation for the classical inversions. Its restful nature is more in line with Shoulderstand than with, say, headstand, so I use the Shoulderstand affirmation: “God’s peace now floods my being.”
In a class where the word “God” may not feel appropriate, I will use, “Peace now floods my being,” mentally infusing the word “Peace” with God’s presence. For an asana that may not feel particularly related to the specific energy of any asana that has an Ananda Yoga® affirmation, I may simply choose to have the student focus on breath, space, or light to help interiorize the experience.
While any student will have his up and down days, if you are not seeing any progress in a reasonable amount of time, you should suggest that the student see a health care provider. There can be many causes for back pain — including problems with internal organs, or cancer — that need to be addressed by a specialist. Similarly, a bulging disc or severe nerve impingement needs intervention beyond what yoga can currently offer the student.
Last but not least, pray for your students — all of them. And remember, the more you practice yoga as a way of life and teach with an attitude of service and respect, the better you will be as a teacher. The more you work to be in tune with your higher self, the deeper your intuition will be. And if you pray for your students and for guidance, it will be as though you have a master teacher, always helping you. These practices are what develop the art of Ananda Yoga therapy.
Blessings to you in your practice and service.
Related Articles
- Yoga for Multiple Sclerosis: A Research Study
- Italian Study: Ananda Yoga Proven to Help Multiple Sclerosis Patients
- What Is Therapeutic Yoga?
- Assessing and Correcting Posture
- Healthy Hips in Hatha Yoga
- Yoga after a Hip Replacement
- Therapeutic Yoga for the Lower Back
- Can Being Too Flexible Be Harmful?
- Thoughts on Lengthening Ligaments


All authors are graduates of Ananda Yoga Teacher Training.

About the Author

Nicole DeAvilla, a yoga teacher since 1984, with a background in sports medicine, chiropractic psyiotherapy, and teacher training.
She teaches Therapeutic Yoga:Musculoskeletal Yoga Therapy and Prenatal Yoga Teacher Training at The Expanding Light.
She also teaches yoga and meditation near her home in Marin County, California, and leads an Ananda Meditation Group.

Receive monthly news and inspiration.